kafka监控工具—Burrow
因为Burrow是用go写的,所以要先安装go环境,如下:
1、下载go安装包:wget https://dl.google.com/go/go1.12.6.linux-amd64.tar.gz
2、解压到指定目录:tar -zxf go1.12.6.linux-amd64.tar.gz -C /usr/local/
3、添加环境变量:
[root@test11 go]# vim /etc/profile.d/go.sh
export PATH=$PATH:/usr/local/go/bin
[root@test11 go]# source /etc/profile.d/go.sh
构建和安装
go get github.com/linkedin/Burrow
cd /root/go/src/github.com/linkedin/Burrow
dep ensure(如果没有安装的执行curl https://raw.githubusercontent.com/golang/dep/master/install.sh | sh,dep命令会生成在/root/go/bin下)
go install
4、编辑burrow.toml如下:
[root@test11 ~]# cat go/src/github.com/linkedin/Burrow/config/burrow.toml
[general]
pidfile="burrow.pid"
stdout-logfile="burrow.out"
access-control-allow-origin="mysite.example.com"

[logging]
filename="logs/burrow.log"
level="info"
maxsize=100
maxbackups=30
maxage=10
use-localtime=false
use-compression=true

[zookeeper]
servers=[ "test11:2181", "test12:2181", "test13:2181" ]
timeout=6
root-path="/burrow"

[client-profile.test]
client-id="burrow-test"
kafka-version="0.10.0"

[cluster.local]
class-name="kafka"
servers=[ "test11:9092", "test12:9092", "test13:9092" ]
client-profile="test"
topic-refresh=120
offset-refresh=30

[consumer.local]
class-name="kafka"
cluster="local"
servers=[ "test11:9092", "test12:9092", "test13:9092" ]
client-profile="test"
group-blacklist="^(console-consumer-|python-kafka-consumer-|quick-).*$"
group-whitelist=""

[consumer.local_zk]
class-name="kafka_zk"
cluster="local"
servers=[ "test11:2181", "test12:2181", "test13:2181" ]
#zookeeper-path="/kafka-cluster"
zookeeper-timeout=30
group-blacklist="^(console-consumer-|python-kafka-consumer-|quick-).*$"
group-whitelist=""

[httpserver.default]
address=":8000"

[storage.default]
class-name="inmemory"
workers=20
intervals=15
expire-group=604800
min-distance=1启动:/root/go/bin/Burrow --config-dir /root/go/src/github.com/linkedin/Burrow/config
Kafka Manager
1、下载安装包:wget https://github.com/yahoo/kafka-manager/archive/2.0.0.2.tar.gz
2、解压安装包到指定目录:tar zxf 2.0.0.2.tar.gz -C /usr/local/
3、yum安装sbt(因为kafka-manager需要sbt编译)
[root@test11 Burrow]# curl https://bintray.com/sbt/rpm/rpm > bintray-sbt-rpm.repo
[root@test11 Burrow]# mv bintray-sbt-rpm.repo /etc/yum.repos.d/
[root@test11 Burrow]# yum install sbt -y4、编译kafka-manager[root@test11 kafka-manager-2.0.0.2]# ./sbt clean dist
提示如下,证明编译完成:
[success] All package validations passed
[info] Your package is ready in /usr/local/kafka-manager-2.0.0.2/target/universal/kafka-manager-2.0.0.2.zip
5、重新解压上面编译好的kafka-manager-2.0.0.2.zip
cd /usr/local/kafka-manager-2.0.0.2/target/universal/
unzip kafka-manager-2.0.0.2.zip
mv kafka-manager-2.0.0.2 /usr/local/kafka-manager-2
[root@test11 local]# cd /usr/local/kafka-manager-2
[root@test11 kafka-manager-2]# ls
bin  conf  lib  README.md  share
6、更改配件文件的kafka-manager.zkhosts列表为自己的zk节点
[root@test11 kafka-manager-2]# vim conf/application.conf
kafka-manager.zkhosts="test11:2181,test12:2181,test13:2181"
7、启动服务,注意请先启动zk,kafka。bin/kafka-manager 默认的端口是9000,可通过 -Dhttp.port,指定端口; -Dconfig.file=conf/application.conf指定配置文件:nohup bin/kafka-manager -Dconfig.file=conf/application.conf -Dhttp.port=8088 &
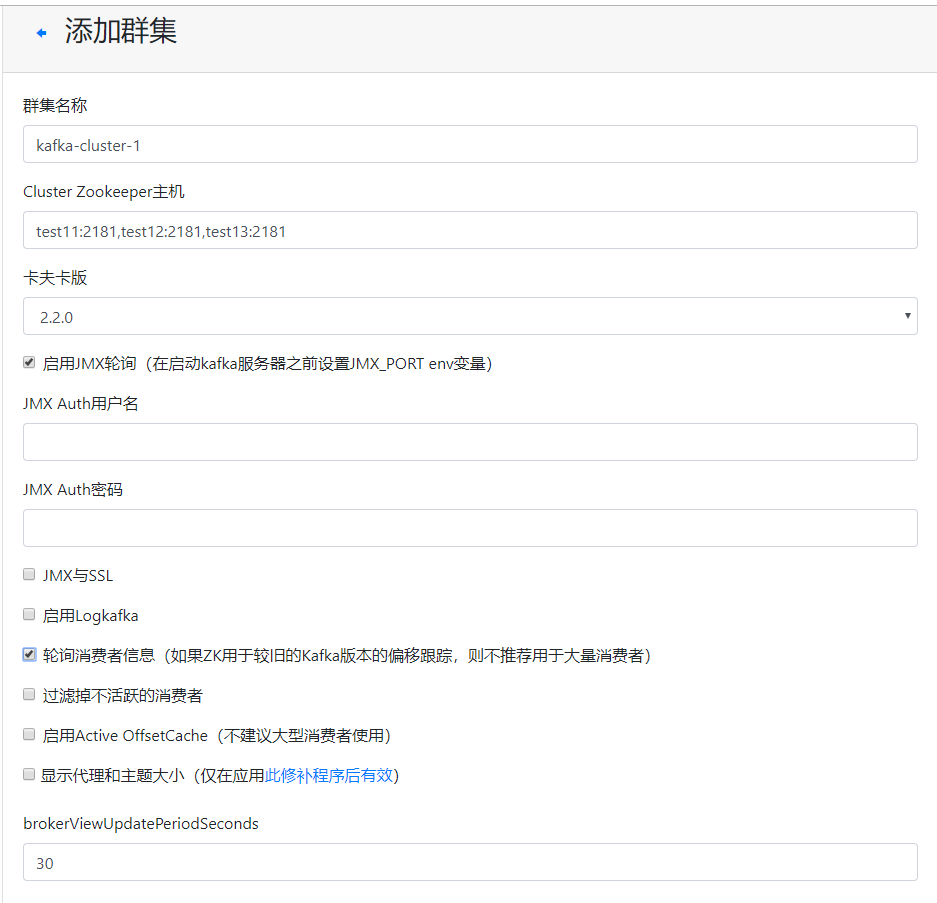
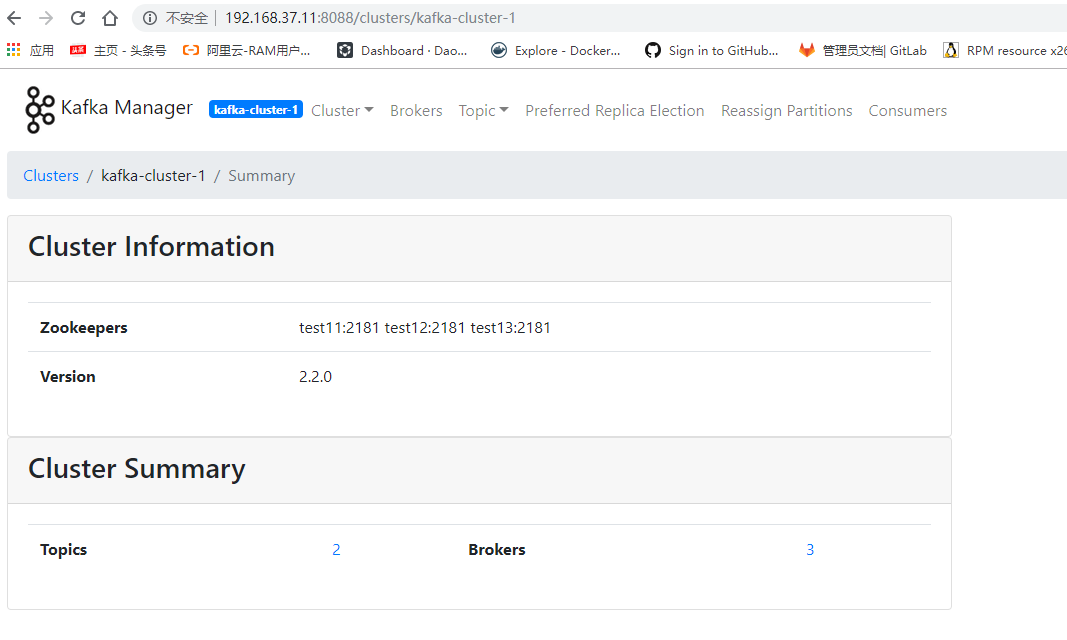
登录kafka-manager 的web界面,并且添加集群,如下:
网址:http://192.168.37.11:8088
截图如下,
创建完后截图如下:
这个kafka-manager界面很简单,基本自行熟悉一下就明白它的功能了,下面就截图主要讲一下其中比较值得注意的三个参数
注:
Broker Skew: 反映 broker 的 I/O 压力,broker 上有过多的副本时,相对于其他 broker ,该 broker 频繁的从 Leader 分区 fetch 抓取数据,磁盘操作相对于其他 broker 要多,如果该指标过高,说明 topic 的分区均不不好,topic 的稳定性弱;
Broker Leader Skew:数据的生产和消费进程都至于 Leader 分区打交道,如果 broker 的 Leader 分区过多,该 broker 的数据流入和流出相对于其他 broker 均要大,该指标过高,说明 topic 的分流做的不够好;
Under Replicated: 该指标过高时,表明 topic 的数据容易丢失,数据没有复制到足够的 broker 上。
